
Overview and Installation Guide for VZSmartPlanner
This document serves as the complete installation guide for the VZSmartPlanner add-on. It includes step-by-step instructions, a video tutorial, and detailed explanations to help you successfully install and set up the tool.

- Go to the top menu and look for Extensions next to Tools.
- Navigate to Extensions > Add-ons > Get add-ons.

In the Google Workspace Marketplace search bar, type VZSmartPlanner.- Select VZSmartPlanner from the search results and click Install.
- Read the terms and conditions. If you agree, click Install.
(1) After installing the VZSmartPlanner Add-On, you can find it under the “Extensions” menu in the top toolbar of Google Sheets.
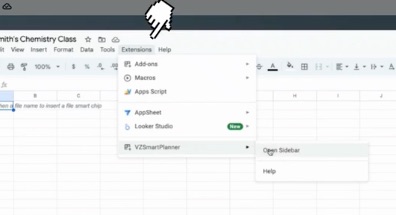
(2) Then click on “Open Sidebar” to display the menu.

(3) Now you’re ready to set up your templates. Go to the next section below to learn how to do this.
For the first-time setup, use the Setup function on the side menu to generate your templates. Then, follow the instructions below to customize them for your needs.
Data Sheet
- Fill out important dates such as the start date of school, the first day of the lesson of the subject you’re teaching, the last day of school, the exam date, etc.
- Use the date picker to ensure that your dates are entered correctly.
- The school start and end date will form the basis of your calendar on your Planning Visual Chart.
- Don’t change the labels in column A; the text must be exactly as it is.
- Enter all your values in column B.
- To customize colors, use the fill color feature in Google Sheets and select the color you want, but you must enter the hex code into the cell. The color hex code has a number format such as #xxxxxx where x are alphanumeric values. For example, black is #000000 and white is #ffffff. Alternately you can use the system default by typing “default” in the cells.
- Enter the curriculum in the Lessons sheet.
- This is a free format page so you can enter any text or leave it blank, and the order is up to you. The program will process the order as you put it.
- Each line represents an activity or lesson, and one will not start until the previous one is completed.
- Use the text “End of Unit” for the program to recognize it’s the end of a section and draws a line in the visual chart.
- The order for columns A, B, and C must not be changed.
- You can add any number of additional columns for your lesson instructions but try to keep them to a minimum as each additional column will slow the program down.
- Use column A for Units and column B for the actual lessons and activities.
- The Days column must be in column C, and the numbers can be any whole number including 0 that you want to spend on each topic or activity.
- Enter the dates of your non-instructional days in the Holidays sheet.
- You can add or remove any of these, and they can be adjusted throughout the year.
- A value of 0 can be used; that entry will be ignored if it is 0.
Click on the VZSmartPlanner option on the menu to bring up the sidebar menu. There are five options:
- Timeline
- Lessons
- Visual Chart
- Pacing Guide
- Google Calendar
Additionally, there are options to hide dates and access help.
Note:
- Options 1 (Timeline) and 2 (Lessons) must always be performed first before 3 (Visual Chart), 4 (Pacing Guide), and 5 (Google Calendar) can be generated.
- For options 3 and 4, if existing sheets are present, they will be overridden.
- For the Google Calendar, a new one will be generated.
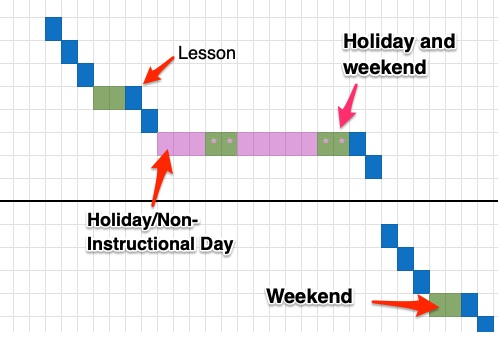
Refer to the diagram for a clear explanation of the color-coding system used in the chart. The diagram illustrates how different cell colors represent lesson days, weekends, holidays, and instances where holidays coincide with weekends.
©Copyright Viziscience® • All rights reserved